Jan Grulich

DMA-BUF support in WebRTC

It will be almost three years since we landed initial support for screensharing on Wayland with the use of PipeWire in the WebRTC project. This enabled screensharing support in both major Linux browsers. Last year I implemented support for window sharing, added support for PipeWire 0.3 and added support for DMA-BUF and MemFD buffer types. Problem was, as it turned out, the DMA-BUF support was not implemented in a correct way.

The original implementation was using mmap() to get the buffer content. This worked correctly for current Intel GPUs, but was terrifically slow on e.g. AMD GPUs. Proper solution is to use OpenGL context to get the content from buffer. However, there were many implementations using mmap() already, including WebRTC and we needed a way how to properly communicate between the server and the client that when the client advertises DMA-BUF support, it means it doesn’t use mmap() and goes through OpenGL context instead.

Here are some issues if you want to read about the details:

This all resulted into a completely different way how the communication between the consumer and the producer should happen in order to use DMA buffers for way faster and smoother screensharing support. Both sides are now required to query the list of all supported modifiers and add this as a new stream parameter, including flags that the modifiers are mandatory parameter, rest of stream parameters are kept as before so we can keep using other types in case DMA-BUFs are not supported by the producer. Once both sides matches their expectations, we can query whether the stream includes modifiers, based on that we know we can use DMA buffers, which we now properly open using OpenGL context, while we kept mmap() for MemFd buffer types as fallback. This will result into faster screensharing support in your web browsers.

Last but not least, I made screensharing even faster, regardless of buffer type we use. Originally when we received buffer from PipeWire, we copied it to a local variable so we can apply cropping and adjust the position and only after that we copied this adjusted content into a DesktopFrame, which each DesktopCapturer (a class representing screensharing implementation) is supposed to return and let it be displayed by the browser. That means we performed two copy operations for each frame. I improved this implementation and now we copy the PW buffer content directly to a desktop frame which we can return directly so one copy operation less than before. I didn’t do some exact measures, but simply running htop and comparing usage of top 5 processes when sharing a 4k screen I got:

  • Original result: 66%, 64%, 26% 23%, 10%
  • Updated result: 41%, 39%, 19%, 17%, 12%

I also have some other improvements on my TODO list, all of them should bring some additional optimizations and improvements. I will keep you informed once I have news to share with you.

Both changes have been merged into WebRTC, that means it should be in Chrome/Chromium 96 (released during November 2021).

HighContrast variants for Adwaita-qt

In the past we used to have a completely different project to cover HighContrast variants of GTK Adwaita theme. This was all implemented as Highcontrast-qt, a project nobody has touched for 6 years. You can imagine how it looks like these days when you compare it to what we have now. I think even GTK variant of HighContrast was a completely separate theme back then, while today days it’s just Adwaita with a different set of colors.

Since GTK made the new HighContrast theme with just few modifications to the original Adwaita theme, I decided to use same approach and have Adwaita-qt to provide all four variants as well (Adwaita, Adwaita-dark, HighContrast and HighContrastInverse). While this looks like a simple thing to do, as you just need to add additional color palette, it was a pain to do it in Adwaita-qt. The reason is that Adwaita-qt is full of hardcoded color definitions, where all of them were randomly taken from GTK Adwaita stylesheets. Everytime something changed in GTK Adwaita, we would have to manually pick the change and replace the changed color value on our side. This was not really sustainable, especially when I wanted to have four different variants.

To improve this situation and make my life easier, I decided to bundle GTK stylesheets for Adwaita theme, have it processed and write a simple parser to make everything automated. And I did exactly that. I included the stylesheets and wrote some definitions myself so I can let them processed with sassc (GTK uses SASS for theming) and have all my definitions substituted for simple parsing. I no longer have to pick all base colors manually, all of them are being parsed for all four variants and same goes for basic styling of Buttons, CheckBoxes and Radio Buttons, where each of them have all kind of possible states (active, hovered, checked etc.) and use not only a simple color, but also gradients. You can imagine how hard it was to hardcode all values for each state. The parser I wrote is really basic and simple with use of regular expressions as the code I’m trying to process is not that complex.

The code I try to process is either a simple definition:

@define-color base_color #ffffff;

Or widget definition in this form:

button:checked { color: #2e3436; border-color: #cdc7c2; background-image: image(#dad6d2); box-shadow: none; }

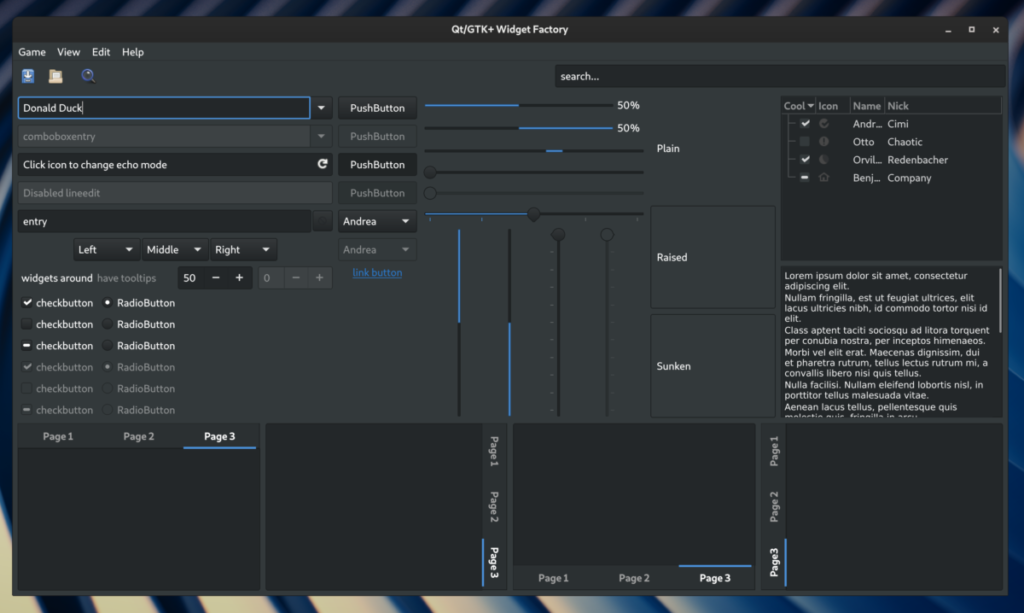
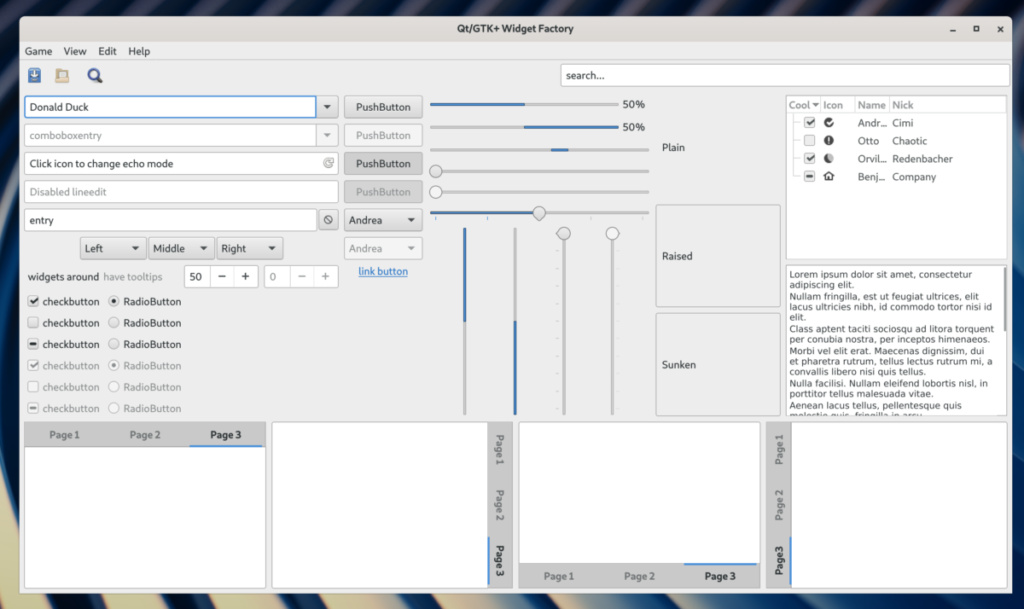
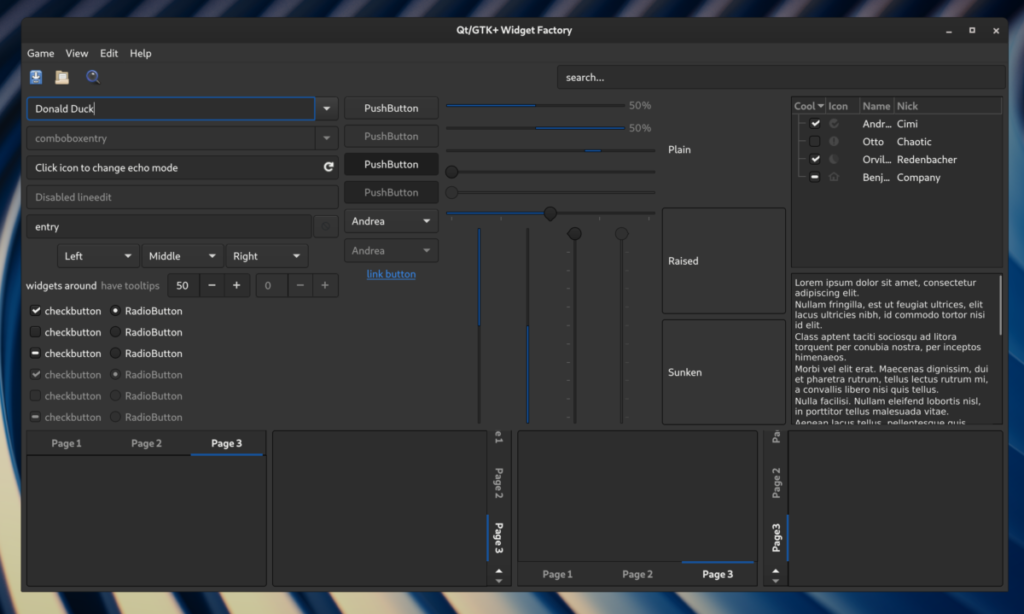
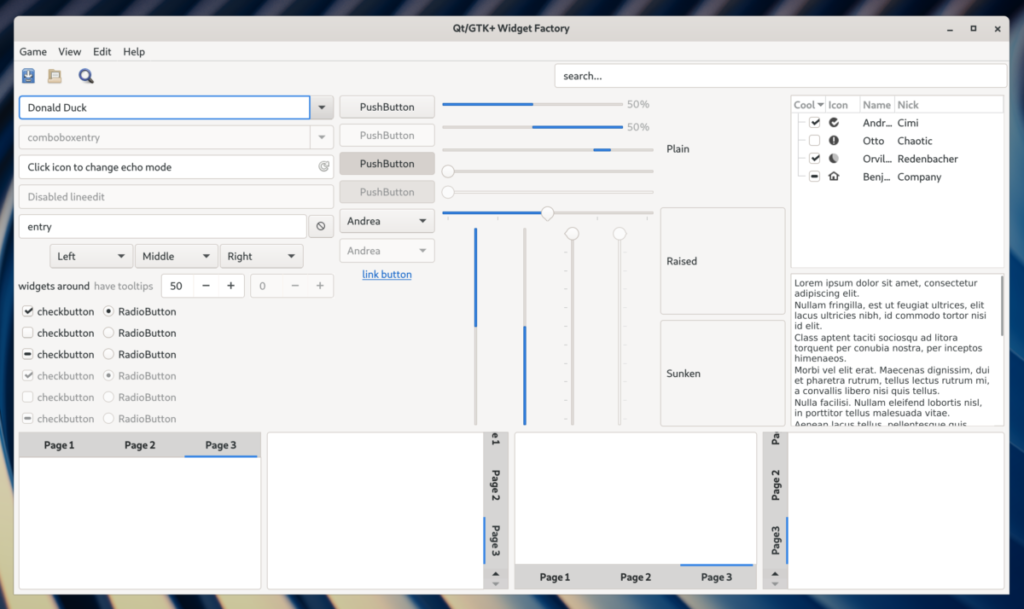
The result is:

Adwaita-qt: Adwaita variant
Adwaita-qt: HighContrast variant

I think this is a big step forward for Adwaita-qt and it will allow me to more quicky respond on changes happening in GTK Adwaita/HighContrast theme. I can also imagine this being extended in the future to support some additional variants, like modified Adwaita theme you can find in Ubuntu (at least if the stylesheet is similar enough). As mentioned, Adwaita-qt now supports four variants and they should be on par with GTK 4.4, at least when it comes to colors and style for most used widgets, because there are still places in Adwaita-qt which need some extra work. Anyway, this all is now released as Adwaita-qt 1.4.0 and I will be updating Flathub and Fedora builds to it soon.

WebRTC/Chromium updates in 2020

In 2019, I started with my first contribution to WebRTC. This was all about screen sharing support on Linux Wayland sessions, using xdg-desktop-portal and PipeWire. Back then, it was quite simple, we only had PipeWire 0.2 and all portal backends supported only screen sharing (no window sharing). While this was relatively easy, it was not ideal as each screen sharing request involved two portal dialogs to get the screen content on the web page itself. For me it was a big success, because I made quite a significant contribution to such a big project, which is used by many people, and a project which is used by all modern web browsers.

At the beginning of 2020, the year everyone would like to erase from their memories, we got PipeWire 0.3 (with slightly different API) and later with xdg-desktop-portal-gtk and xdg-desktop-portal-kde (later this year) people were finally able to share application windows. Support for all of this was lacking in WebRTC, because back then those were not available. I wanted to tackle all issues at once, bring support for window sharing and get rid of the “dialog hell” with portals, which was even worse with the new window sharing capabilities in portal backends.

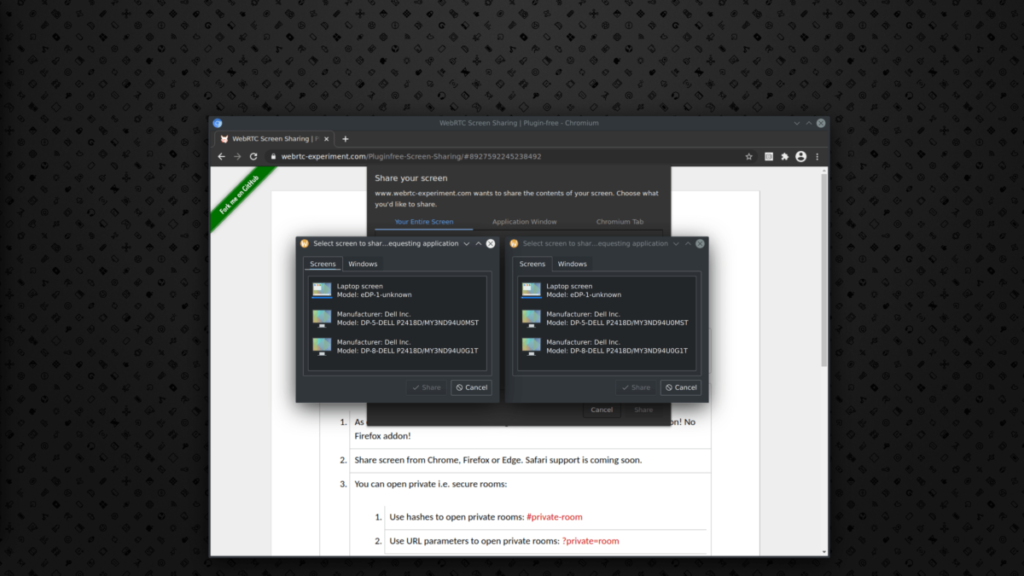
This is what the situation looks like. With each request to share a screen, you got the preview dialog from Chromium. This dialog consists from three pages. One is for screen sharing making one portal request, second one is for window sharing, which is another portal request, and the last one is just to allow you to share a web page you have opened. You had to confirm both portal dialogs, then confirm the Chromium dialog and finally you got one more portal dialog (ouch) to get the screen content on the web page itself.

I had a solution. I made all portal calls identified with an ID and shared this ID (portal call) in Chromium between both pages in the Chromium preview dialog and with the request made for the web page itself. With this solution we only had ONE portal dialog. This was a perfect solution (at least seemed to be). I started working on this at the beginning of this year, we exchanged many emails with people from Chromium UX team, because I wanted to do also some minor UI changes in the preview dialog. Unfortunately, those were rejected for consistency with all platforms. It was not a big deal and I submitted my changes for review, keeping UI as it was, just adding all necessary bits into Chromium and WebRTC to make it all work.

I wish to say things went smoothly since then, but the opposite is true. It took a while to get everything reviewed, but this is probably no surprise with this year being weird and many people working from home with less than ideal conditions. Anyway, few months passed away, I ended up rewriting my changes many times, not even counting hours I spent on it. This all resulted into me being obsessed with this change, it mattered to me so much to get it merged. I was constantly thinking about how to make it better, I was many times fixing issues in the evening (as reviewers were mostly US based), instead spending time with my family. It would be even better to waste my time with my beloved Playstation. This had really negative impact on my mental health and I realized this has to stop and I simply gave up, because I couldn’t continue this way and needed a break. I abandoned both changes (WebRTC and Chromium) and decided to just pick changes I will be able to successfuly upstream. I probably made my change too ambitious and complicated or maybe it’s just Chromium not being ready for this kind of change, because some tweaks were specific for my use-case. It’s also hard to say I wish upstream devs had helped me more, because there is so much to understand around Wayland, portals and PipeWire and way how it all works together.

Anyway, with a new start, without pressure after gaving up on the change, I picked the most important changes and submitted them separately. I was surprised now how smoothly this went and how fast those changes were upstreamed. Simply those changes were simple, understandable and easy to review. I didn’t gave up on fixing the “dialog hell” completely, I have some other ideas, but next time I will try to submit them step by step and will keep some distance and my free time.

And what are the changes you can expect in upcoming Chromium release in 2021?

Support for PipeWire 0.3

You can now build Chromium/WebRTC with both PipeWire 0.2 and Pipewire 0.3. There is a new “rtc_pipewire_version” option you can pass to your build configs.

Window sharing support

There is probably no description needed. You will be able to share application windows in case you don’t want to share whole screen.

Suppport for DmaBuf and MemFd buffer types

This should allow faster transfer of your screen content from your Wayland compositor, through PipeWire to your browser.

Less portal dialogs involved

If you look back into the screenshot I posted above, you can see there are two portal dialogs opened just for the Chromium preview dialog. I at least tried to reduce this to just one portal dialog. This was done by removing the page for window sharing, because the screen share request will already handle both screen and windows.

I think you can expect above mentioned changes in Chromium 89 and I hope you will at least appreciate some of these improvements even though I didn’t deliver everything I wanted to. Also, thanks to Martin Stránský from our Firefox team, you can expect all these changes to be also part of Firefox.

Happy holidays and see you in a better year.

Refreshed UI for Fedora Media Writer

For those who don’t know, Fedora Media Writer is a tool to create bootable live USB drive with your favorite flavor of Fedora. It is written in C++ with UI written in QML and it is supported on Linux, Windows and Mac OS X. It was developed by Martin Bříza, my former collegue from Red Hat, who did an amazing job in the past. Fedora Media Writer (FMW) primarily targets Fedora Workstation and therefore the UI looks like a GNOME app using Adwaita theme. Unfortunately the Adwaita theme changed over time and originally FMW was written using QtQuickControls 1 (deprecated these days) so it needed an UI overhaul.

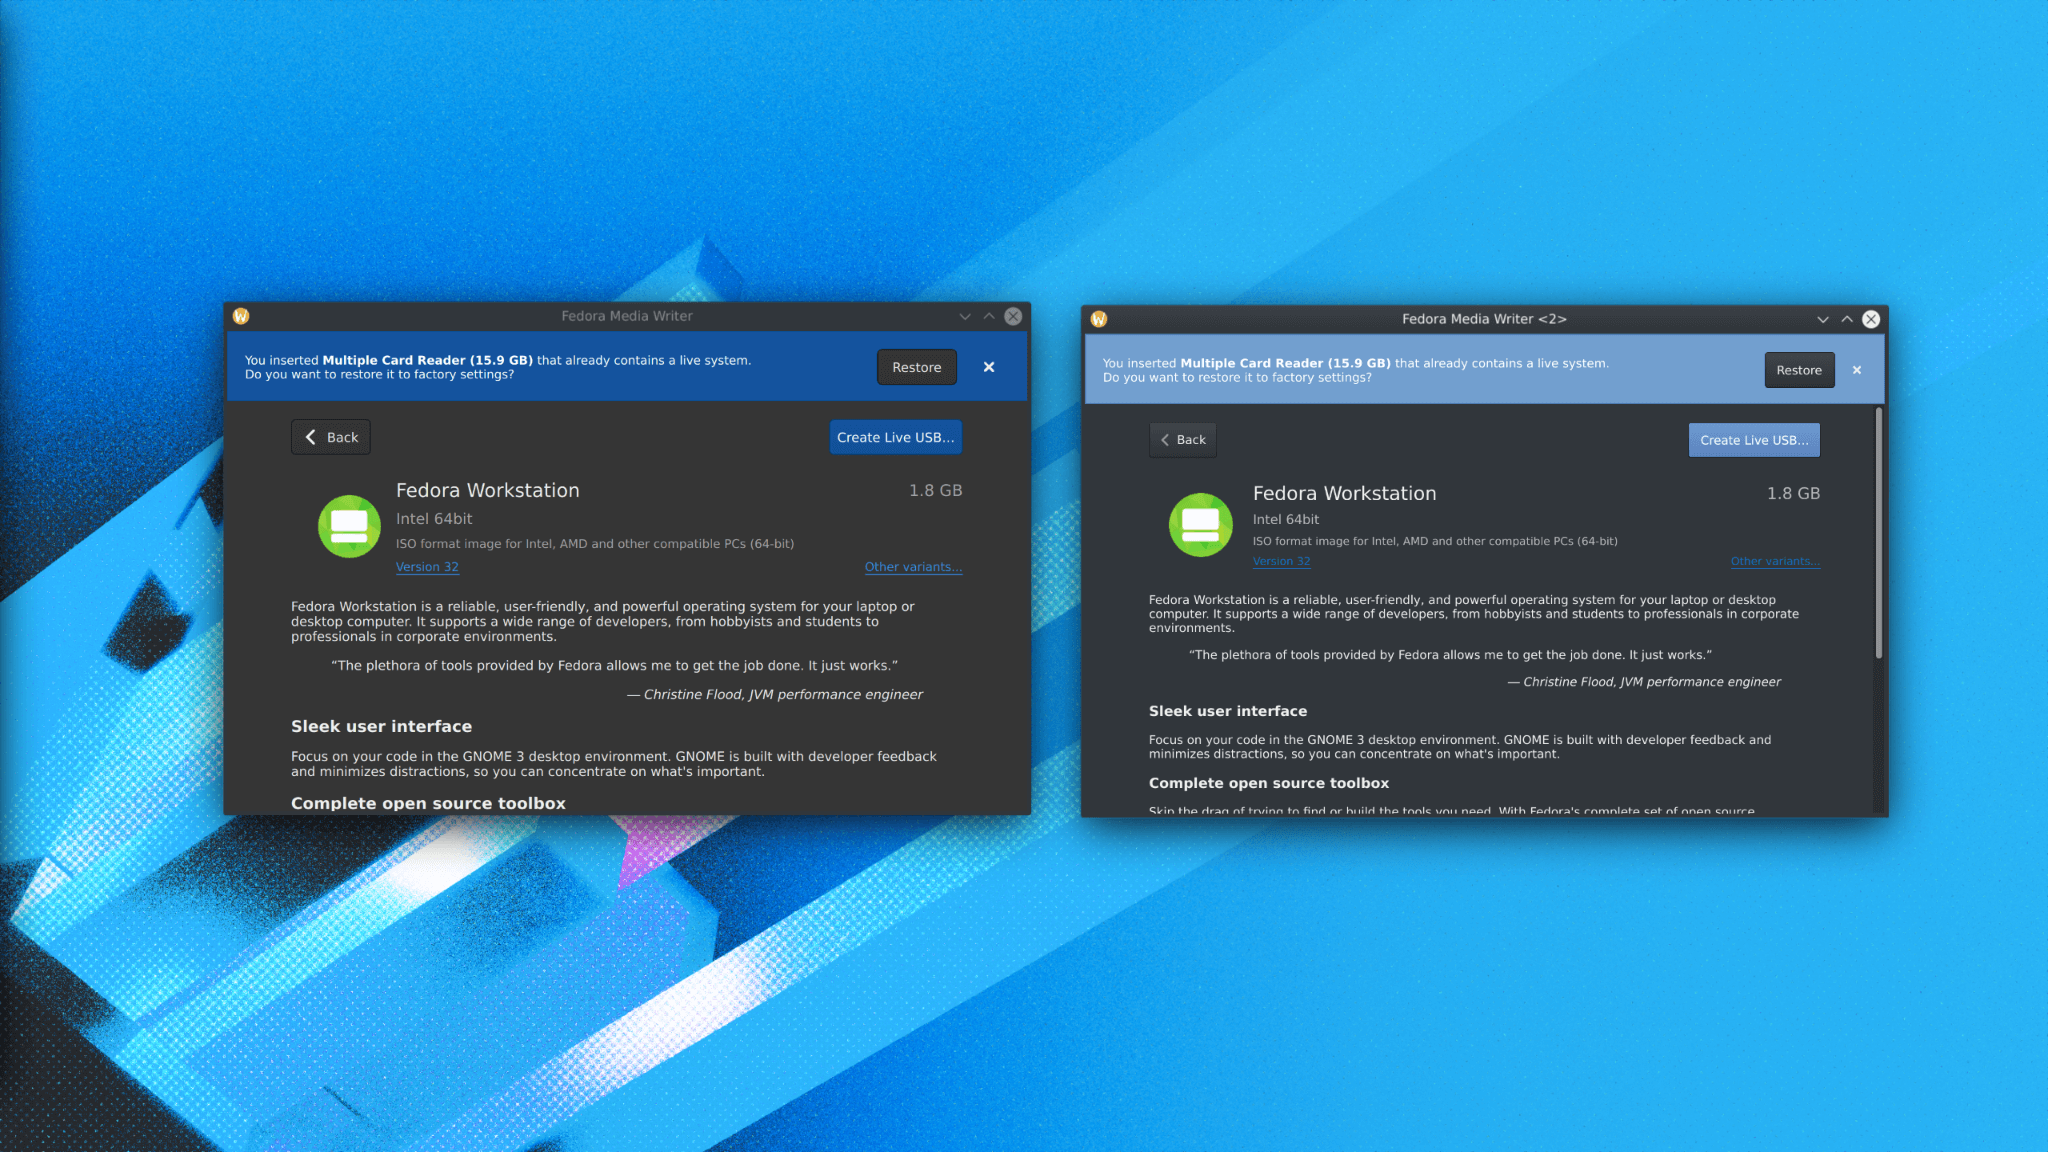
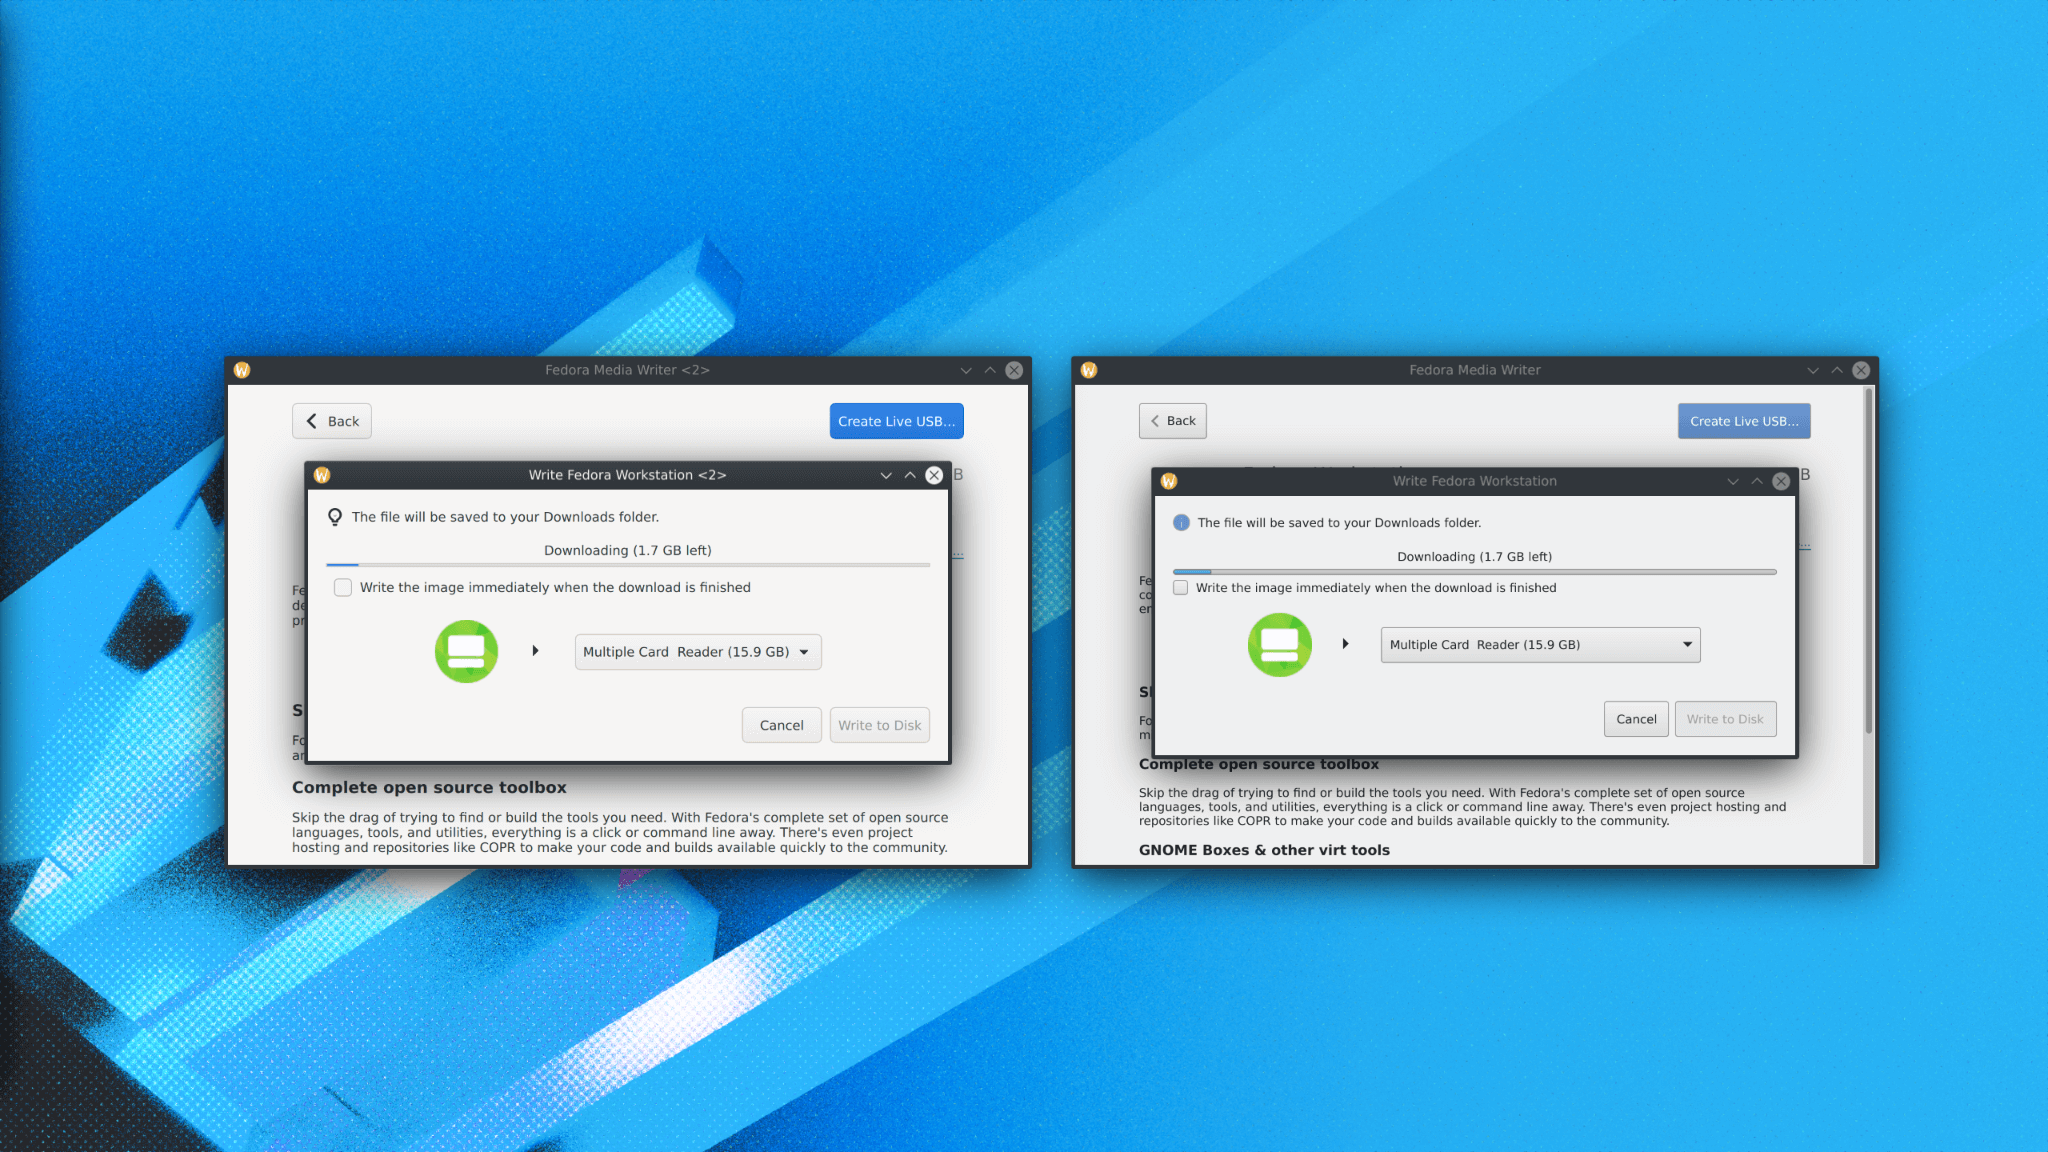
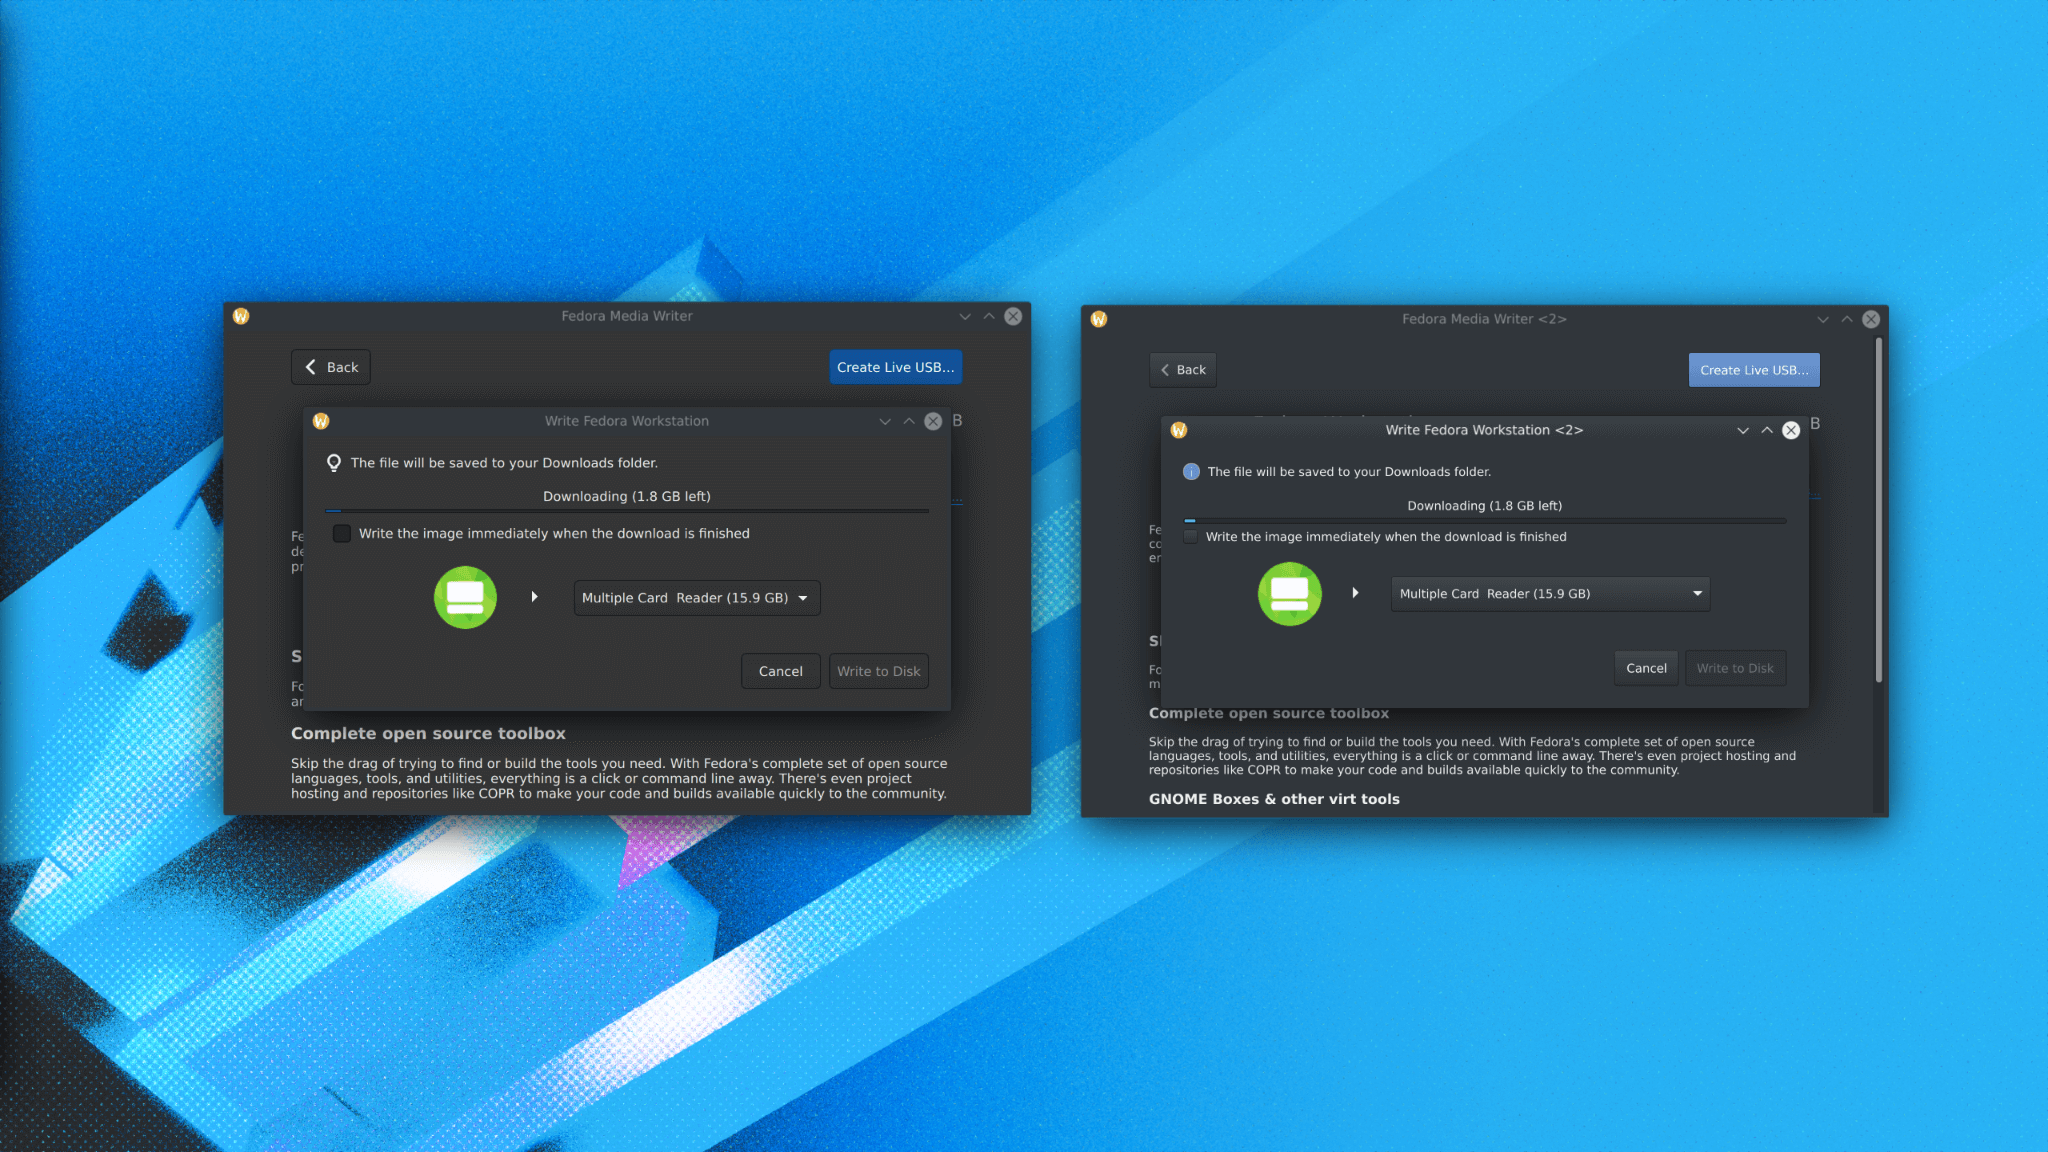
I started working on FMW during the summer, slowly migrating it to QtQuickControls 2. The original UI had lots of custom QML widgets, basically standard widgets with Adwaita skin on it. I still wanted FMW to use Adwaita theme, because Qt doesn’t have any native QML components for Windows, Mac OSX or GNOME and writing those would require lots of work. Therefore I decided to write a new QQC2 based Adwaita theme which can be used on all platforms. To avoid duplicating half of the code we already have in Adwaita-qt (a QStyle to make QWidgets look like Adwaita), like information about widget sizes and colors, I reworked Adwaita-qt to provide a library so it can be used by projects like this and so they don’t need to update everytime Adwaita changes. It was more work than I anticipated because it needed quite a lot of changes to separate things into library and also to make it build and work on all platforms where I want to use FMW. Good news is that the work is now done and I made a pre-release of Adwaita-qt. The library for now provides information about widget sizes, color palette and colors used by all widgets, but I plan to extend this in future with addition of Adwaita-qt rendering part allowing the library to render basic widgets for you. That’s something I would like to use for example in QGnomePlatform (GNOME platform theme) to render buttons in window decorations. With a lot of information being already said about Adwaita-qt, the work on QQC2 Adwaita theme was an interesting experience and probably the most enjoyable one, because everytime you write a new component and port the app to use it, you see the result of your work and the app slowly migrating towards a more modern UI makes you happy with the result. I don’t know what more to say about the QQC2 Adwaita theme as it’s basically QML variant of widgets we have in Adwaita-qt, with difference that it should look exactly the same on all platforms thanks to using Adwaita-qt. In past with QQC1 all the colors were derived from system QPalette making it slightly different on all platforms. If you wonder why the QQC2 theme is not part of Adwaita-qt, where it will most likely end up, then it’s because it’s not complete yet and contains only components used in FMW itself. Anyway, I have finished the port to QQC2 this week with some late fixes and after I spent a week updating all build systems (Windows, Github CI, Mac OSX) to properly build and produce builds for you to test since I made a new pre-release yesterday \o/.

The work on this port is most likely not 100% finished as I expect some minor issues to appear here and there, but I tried to make this 1:1 copy of the previous version so don’t expect any major changes. I will be glad if you try it and let me know what you think. Thank you and especially big thanks goes to Martin Bříza for his help during the development and for the work he did on this project in the past.

You can get it from following locations:

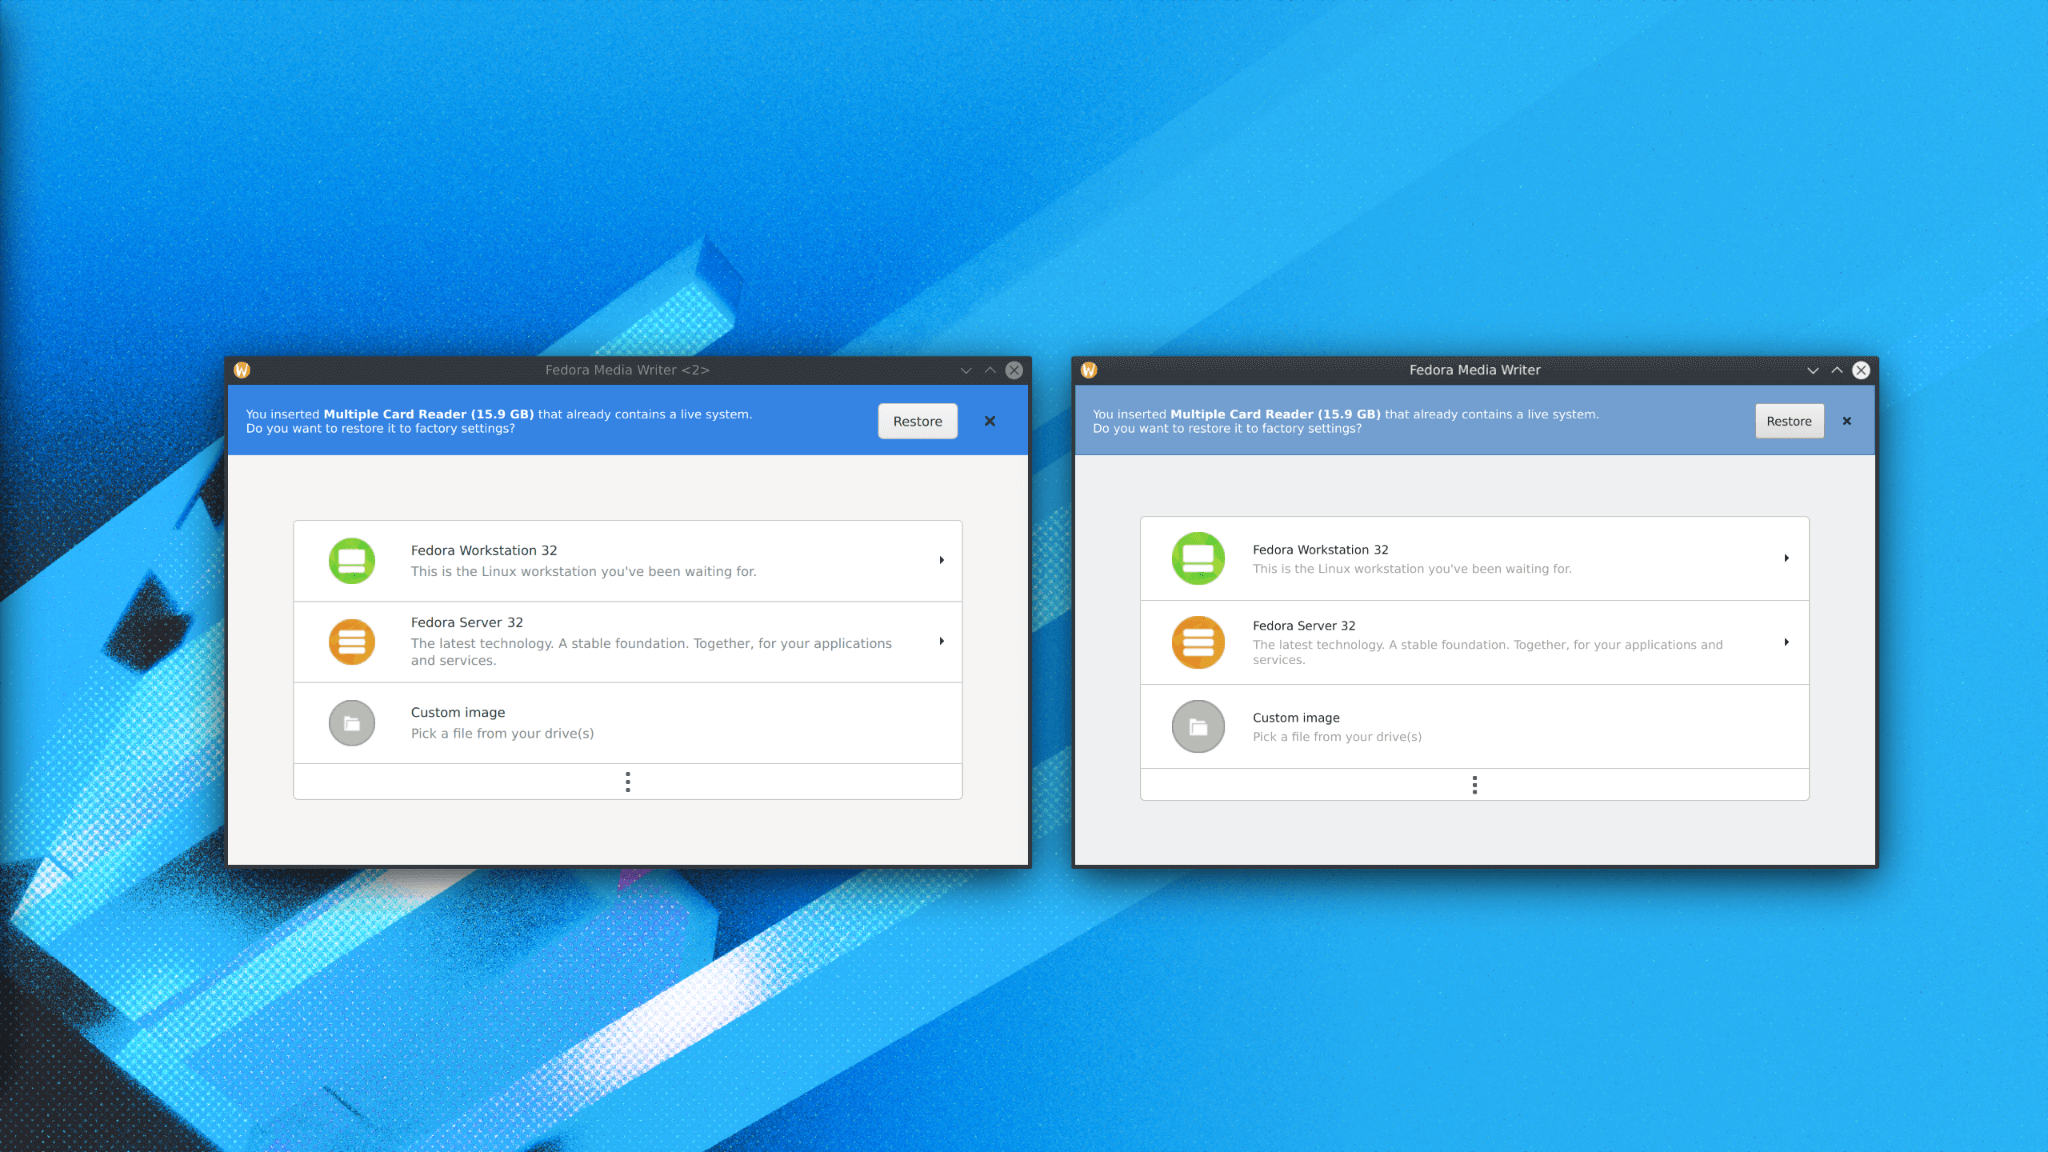
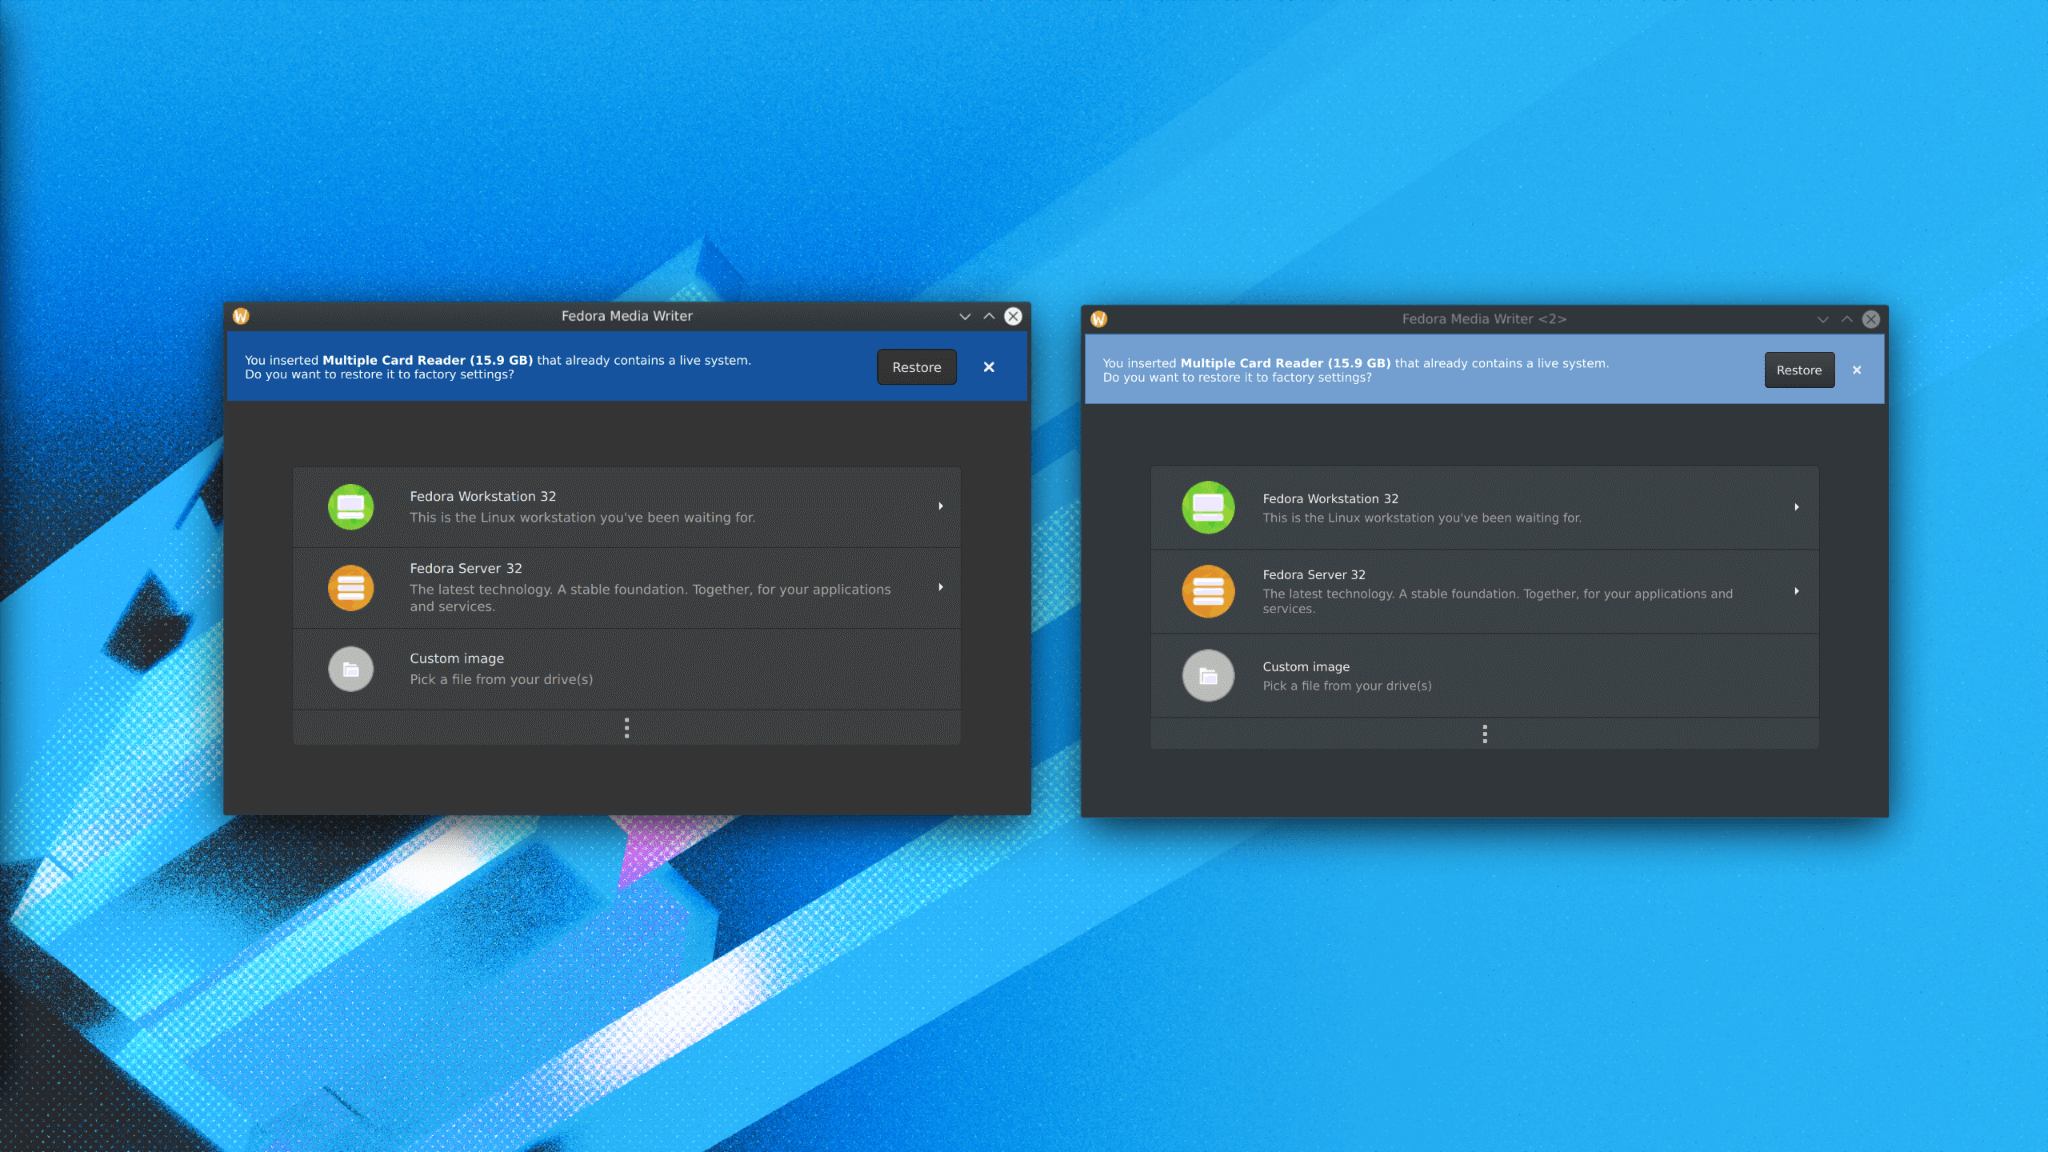
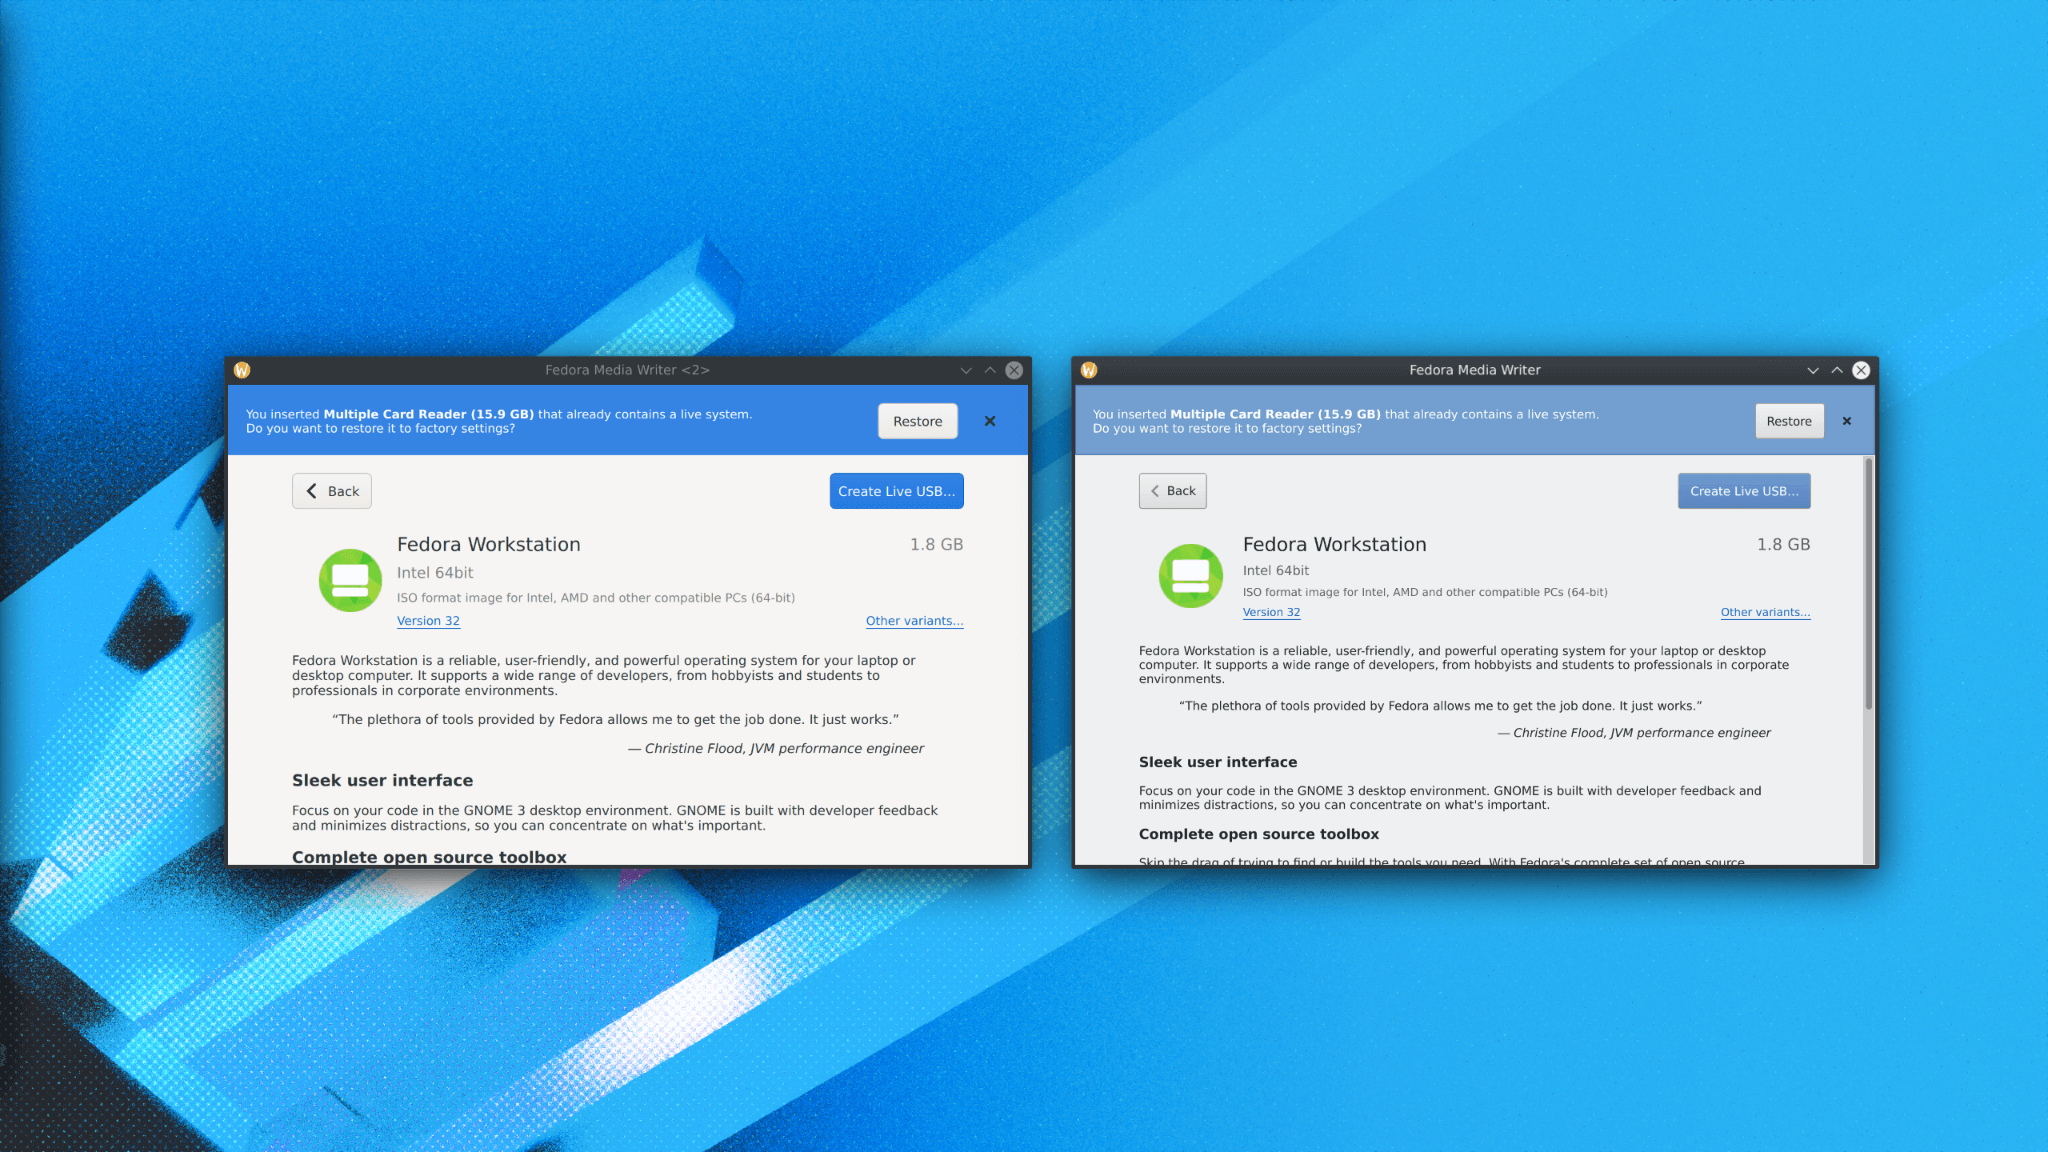
Here you have some images for comparison:

Cute Qt applications in Fedora Workstation

Fedora Workstation is all about Gnome and it has been since the beginning, but that doesn’t mean we don’t care about Qt applications, the opposite is true. Many users use Qt applications, even on Gnome, mainly because many KDE/Qt applications don’t have adequate replacement written in Gtk or they are just used to them and don’t really have reason to switch to another one.

For Qt integration, there is some sort of Gnome support in Qt itself, which includes a platform theme reading Gnome configuration, like fonts and icons. This platform theme also provides native file dialogs, but don’t expect native look of Qt applications. There used to be a gtk2 style, which used gtk calls directly to render natively looking Qt widgets, but it was moved from qtbase to qt5-styleplugins, because it cannot be used today in combination with gtk3.

For reasons mentioned above, we have been working on a Qt style to make Qt applications look natively in Gnome. This style is named adwaita-qt and from the name you can guess that it makes Qt applications look like Gtk applications with Adwaita style. Adwaita-qt is actually not a new project, it’s been there for years and it was developed by Martin Bříza. Unfortunately, Martin left Red Hat long time ago and since then a new version of Gnome’s Adwaita was released, completely changing colors and made the Adwaita theme look more modern. Being the one who takes care of these things nowadays, I started slowly updating adwaita-qt to make it look like the current Gnome Adwaita theme and voilà, a new version was released after 3 months of intermittent work. You can see the results here:

Isn’t it beatiful? The theme is far from being perfect and there will definitely be still some minor issues, but writting a Qt style is far from being an easy task as the QStyle class is quite complex. If you find any issue, you can open a bug and I will try to fix it. You can also send me patches if you decide to fix something yourself (I will be happy for that). The repository is hosted on GitHub under FedoraQt/adwaita-qt.

And of course it was a lie, the screenshots above are the old version of adwaita-qt (for comparison), the new ones are actually here:

I hope you like it more now :).

Tutorial: Screen Sharing and Remote Desktop on Fedora Workstation 30 (Wayland)

I recently got an email from a user asking me how to make all this work on Fedora. Problem is that unlike in old XServer sessions, there are certain things which need to be enabled first. There are also dependencies which need to be installed and services which need to be running. While most of the dependencies are automatically installed and services automatically activated, there still might be situations when this is not true, for example when switching from another desktop so it’s better to cover it all. This tutorial targets Fedora, but it can be probably used by any other distribution.

Dependencies

Both screen sharing and remote desktop work almost identically on Wayland, they both use portals as a communication tool between applications and compositor (in this case Mutter) to start the process of sharing and setup PipeWire stream (see below). While portals were primarily meant to be used by sandboxed applications (e.g. Flatpak) to get access to system (like files or printing) outside the sandbox, their design perfectly fits for Wayland usage too. In Fedora you should have portals automatically installed, they are represented by two separate packages, first is xdg-desktop-portal, which is the portal service communicating with sandboxed applications and with a backend implementation of portals, and the second package is the backend implementation, in our case xdg-desktop-portal-gtk. Both are DBus activatable, which means they are automatically started whenever application calls them. The reason why portals consist from two services is that there can be multiple backends, each one providing native dialogs for your desktop. For example you don’t get a gtk dialog to open a file in KDE Plasma session or you want a backend communicating with specific compositor (like in our case with Mutter).

The second important dependency is PipeWire. PipeWire is the core technology used for screen content delivery from the compositor to applications. This is done throught a PipeWire stream shared between the compositor and application. PipeWire should be automatically installed on your system, the package name is pipewire and it provides socket-based activation so you shouldn’t need to worry if it’s running or not.

Enabling screen sharing and remote desktop in Gnome

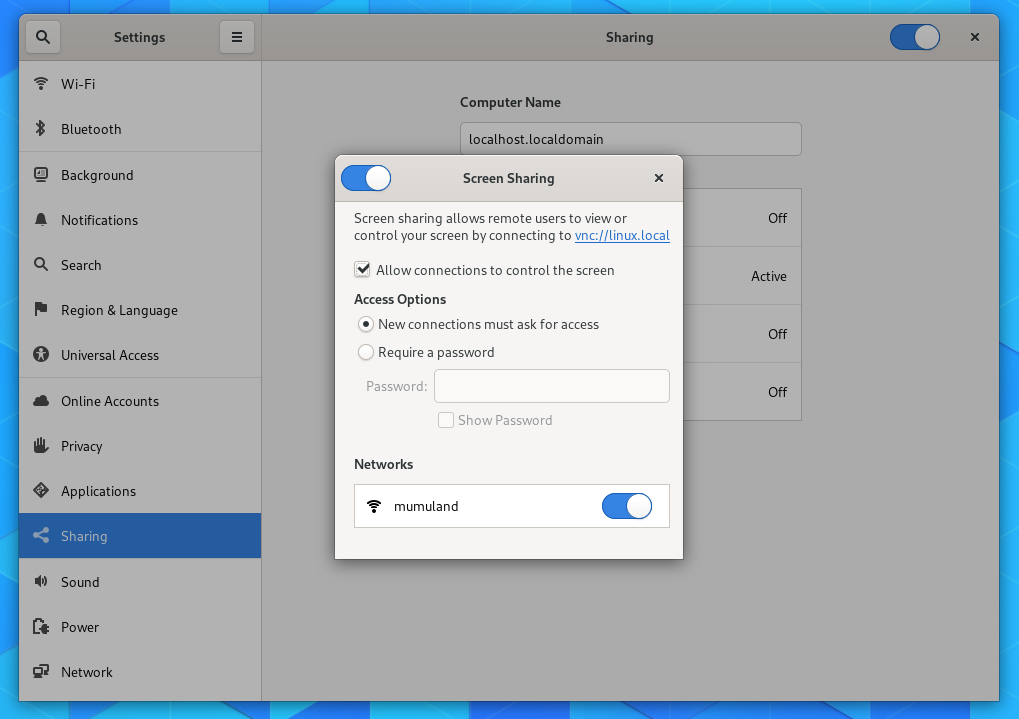
You don’t seem to do any additional step in order to make screen sharing work. However, you need to enable remote desktop (if you want to). Go and open gnome-control-center (Settings) and there go to Sharing section. There you should see this window when you click on Screen Sharing:

If you don’t have such option, make sure you have installed gnome-remote-desktop, because I’m not sure whether it’s installed by default. Allowing screen sharing will start a server instance which you can connect to from another computer, using vnc://linux.local or your_computer_ip:5900. You will most likely need to open a hole to your firewall, but the same you need to do for any other VNC server. I tried to connect with Vinagre and Krdc (KDE VNC viewer) and both worked for me, but I was unable to connect with Tigervnc (vncviewer) due to not maching security type.

Screen sharing in Firefox

Firefox in Fedora already comes with PipeWire support enabled and you don’t need to do anything special. You can test it for example with this testing page. The PipeWire support in Firefox unfortunately needs to be enabled during build by handmade changes, which is most likely not happening in other distributions, but from what I now there is an ongoing effort to make this configurable with a build option.

Screen sharing in Chromium/Chrome

Similar situation is with Chromium, where PipeWire needs to be also enabled during build, but it’s already configurable via a build option. In Fedora we have this enabled by default. Official Chrome builds are build with PipeWire support enabled as well. I should maybe mention that PipeWire support is in Chromium starting with version 74.

Unlike with Firefox, this support needs to be also enabled in runtime. You can do that with following chrome flag:

chrome://flags/#enable-webrtc-pipewire-capturer

Then you should be all set to be able to share a screen or a window from your Chromium or Chrome.

Issues

Don’t get scared by higher number of dialogs for screen/windows selection you will get when sharing screen in your browser. We are aware of this annoying usability issue and hopefully we will manage to solve it one day. The reason why this happens is that every browser provide their dialog for screen/window selection and in both browsers these dialogs show previews of your selection. You need to select screen/window first in the portal dialog for the preview dialog and once you accept the preview dialog in your browser, you again need to select screen/window in the portal dialog to get the content into the web page itself.

Support in other applications

There is a KDE application called Krfb, which in the next release (19.08) will have similar support for remote desktop on Wayland as you have in Gnome. Otherwise there are probably no other applications which would allow you to share a screen or control your desktop remotely on Gnome Wayland sessions. You will not be able to use TeamViewer, Tigervnc or any other application you are used to use. If you want to use these applications, you will have to switch to X session for now.

Upcoming news in Plasma 5.16

Plasma-nm

WireGuard support

We already had WireGuard support in Plasma 5.15, but it existed as a VPN plugin based on a NM WireGuard plugin, which wasn’t really working very well and didn’t utilize many of already existing NM properties. With release of NetworkManager 1.16, we have a new native support of WireGuard which is much more usable. It now exists as a new connection type so it’s implemented a bit differently compared to other VPNs. This mean that we had to implement first support for this connection type and its properties into NetworkManagerQt and implement an UI on top of that. The UI part of the new WireGuard support, same as the old VPN plugin, were implemented by Bruce Anderson. We are also probably (at this moment) the only one who provides an UI for WireGuard configuration so thank you Bruce for such a big contribution.

OTP support in Openconnect VPN plugin

Another big contribution, this time made by Enrique Melendez, is support for one time passwords in the Openconnect VPN plugin. This support was missing for some time so starting with Plasma 5.16, you should be able to use TOTP/HOTP/RSA/Yubikey tokens for your Openconnect connections.

PAN GlobalProtect VPN

OpenConnect 8.00 introduced support for PAN GlobalProtect VPN protocol. You can now see this new VPN type entry thanks to Alejandro Valdes.

Xdg-desktop-portal-kde

Remote desktop portal

Remote desktop portal brings possibility to control remotely your Wayland Plasma sessions. It utilizes screensharing portal to get the screen content and adds API for mouse/keyboard/touch control. Unfortunately at this moment only mouse support is implemented, mainly because I use KWayland::FakeInput protocol and mouse support is the only one currently implemented there. At this moment there is no Qt/KDE based application using remote desktop portal (or at least released one), but I have added support into Krfb, which is currently on review and I hope to get it merged for KDE Applications 19.08. Alternatively you can use gnome-remote-desktop.

Here is a short demo of remote desktop in action over VNC protocol. On the server side I’m running Krfb on Plasma wayland session and I control it from my second laptop using Krdc.

Integration of sandboxed Qt applications

We have been using various tweaks to make sandboxed Qt apps well integrated into the system. For KDE Plasma integration, we have been allowing access to kdeglobals config file, where we store the most common configuration, like used icon theme, widget style, etc. A similar approach has been used by Gnome, where they need to allow access to DConf, otherwise applications will not be able to read default system configuration. These tweaks have been usually set in the runtimes and applications using these runtimes automatically inherited all the needed permissions during the build. This has some weak spots, because changing permissions in the runtime requires all applications to be rebuild to pick up the changes, or applications not using the runtimes at all had to allow all the access themself and really not everyone knows what everything needs to be enabled.

This will change with upcoming release of xdg-desktop-portal (version 1.2), which will bring new portal to solve this problem (for both Flatpak and Snap). There is new “Settings” portal, allowing apps to request various configuration from the sandbox, without need to have access outside (kdeglobals, dconf). For Gnome configuration, this has been built in directly in xdg-desktop-portal so there is no need for specific backend support. For KDE Plasma configuration, we have our specific code reading kdeglobals config file in xdg-desktop-portal-kde. This support has already been merged and will be part of Plasma 5.15 release in February. To make applications automatically ask for this configuration through the portal, instead of reading kdeglobals/dconf, I added support to both widely used Qt QPA plugins. For applications running under Plasma we have now this implemented in plasma-integration plugin. This support will be also released with Plasma 5.15 in february. For Qt apps running in Gnome, I added this support into QGnomePlatform, which has been released already some time ago and is already available in Flathub.

Hopefully with all of this released soon and more widely used, we can slowly start removing all the hardcoded permissions for both dconf and kdeglobals config file in the runtimes.

Flatpak support in KDevelop

Recently I had a discussion with Carlos Soriano from our Red Hat desktop team about Flatpak support in KDevelop, he was told, when discussing Flatpak support in gnome-builder during KDE Akademy, that we already have support in KDevelop for flatpaks. I told him we really do, but that it’s more in the state of proof of concept and it’s probably not that easy to use it as in gnome-builder. We have this support since KDevelop 5.2, but it never made it to release notes and I guess not many people know about this. I only found some information about it in a blog post from Aleix Pol. I decided to give it a try, I actually already tried it once when I saw that blog post last year, but this time I would like to give a small how to and encourage you to try it and give some feedback to Aleix so we can improve this workflow.

Let’s start:

1. Open a project in KDevelop

This should be something you can build and run in Flatpak, which means usually an application. The easiest way is to open KDevelop, go to Project → Fetch project, and download your favourite application and open it as project.

2. Get flatpak manifest

Our plan for future is to distribute flatpak manifests together with applications in their repositories, currently we don’t do that so you have to either write your own, or go to our flatpak-kde-applications repository and get manifest for your application from there. Copy it to the root directory of your project. I think the name of the manifest needs to match your application appstream name, otherwise you will not be able to build it as flatpak.

3. Build flatpak

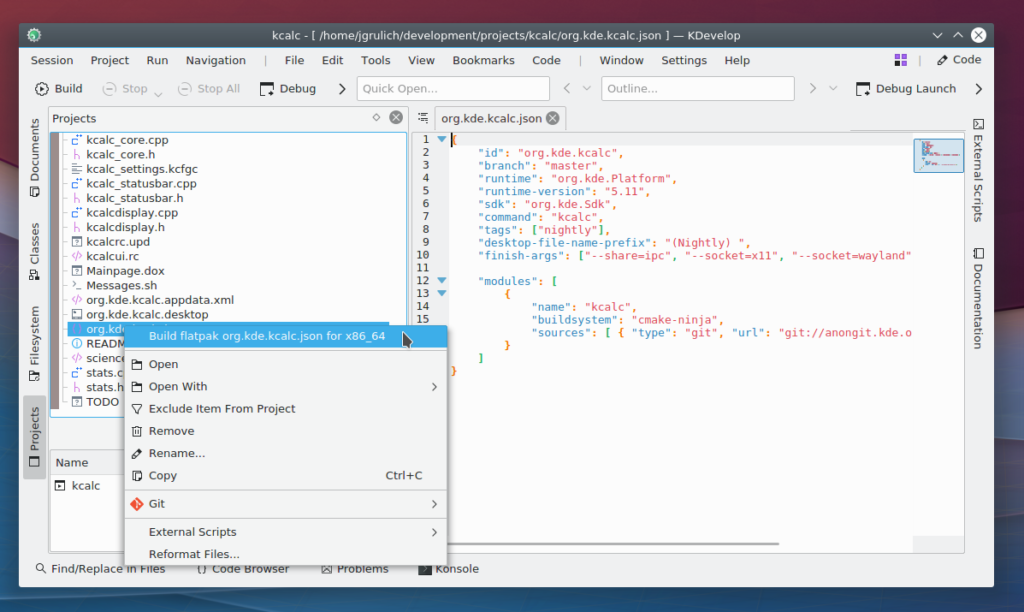
You can now right-click with your mouse on the application manifest and select “Build flatpak org.kde.AppName for x86_64” to build current manifest. I assume you have needed runtime and sdk installed, if not, you can get them from Flathub. If for example you see your app has runtime-version: 5.11 in the manifest, then run flatpak install flathub org.kde.Platform 5.11 and flatpak install flathub org.kde.Sdk 5.11.

This will build the app as specified in the manifest, still your modifications, if you made any to the application, will not be applied yet.

4. Use flatpak runtime

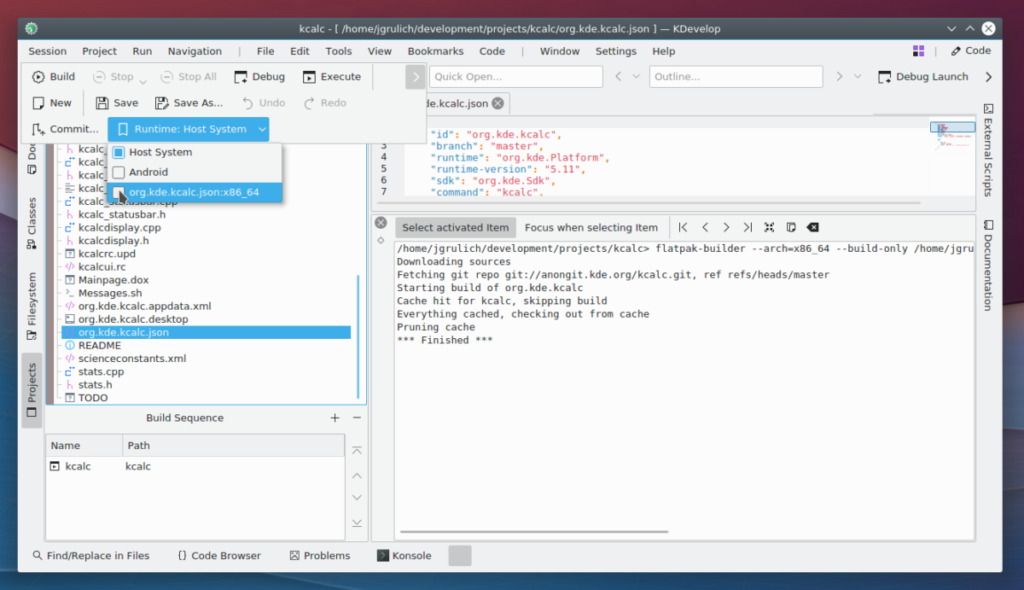
If you built your application successfuly in the previous step, you can now switch the app to be build under Flatpak runtime. This is either in the menu under Run → Runtime or it should be also accessible from the toolbar.

If you switch to Flatpak runtime, you will get a dialog to configure a build directory. Select a different build directory, for example to $HOME/path/to/project/build-flatpak and set installation prefix to /app, which is where applications are installed under flatpak.

5. Final build

If you now click to build your application, you will see it runs flatpak build command to build your application. To launch it, you need to configure a launcher to use binaries from build-flatpak folder. If you are in the flatpak runtime, then it will automatically start your application with flatpak run command.

6. Benefits

You might be asking why anything like this is useful or why such integration has been made. There are few reasons for that.

  • Reproducible builds: this means that if you build your app + your change for example with KDE Runtime based on Qt 5.11, anyone else will be able to build it against same runtime and your new feature or fix should behave identicaly.
  • Usage of different libraries: you might be running latest Qt, but someone reports you that your application is crashing using older version of Qt. You definitely don’t want to build older Qt and install it to a prefix and make your application use it, just to fix a bug you cannot reproduce. With this KDevelop integration, it’s just a matter of changing runtime version in the application manifest.
  • Easy installation of build environment: for people who are new to all of this, it is definitely easier to install everything with just one basic flatpak command. You need to usually just run flatpak install flathub org.kde.[Platform, Sdk] 5.11. This will install everything you need to build every KDE application and you don’t need to mess with your system libraries.

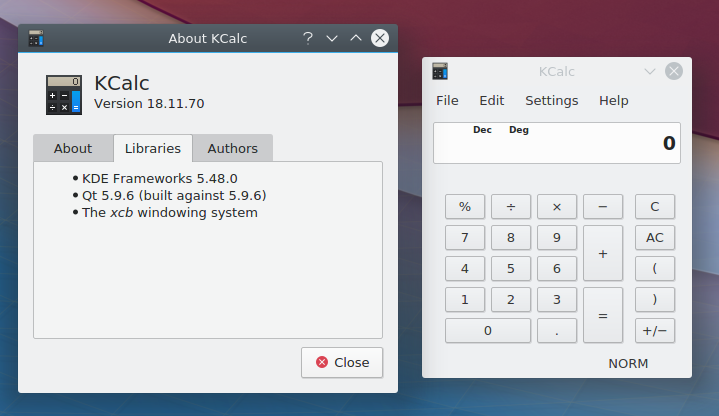
This is kcalc running on KDE Runtime 5.9, while my system is on Qt 5.11.1.

7. Provide feedback

If you try this and have some suggestions for improvements, please share them with Aleix Pol, this is in my opinion something worth improving and helpful for beginners. You can also consider improving it yourself, you should be even able to do that from KDevelop running in flatpak, as flatpak can also run flatpaks inside.

Going to Akademy

Like many people around, I plan to attend Akademy this year. I unfortunately was not able to attend it last year, when it was in Spain again and damn, I love Spain, but this time I cannot miss it, especially when it’s so closed to Czech Republic. I’ll be there from the very first day until Thursday 16th of August. We will be organizing a BoF focused on Flatpak and Snap on Tuesday 14th of August in the morning so if you want to discuss or help with anything Flatpak and Snap related then you are more than welcomed. You can also reach me anytime during the conference if you want to discuss  something about other stuff I’ve been doing, like plasma-nm or lately screen sharing through PipeWire. See you in Vienna.

Scroll To Top